Hosting your blog on GCP with GHOST, Nginx, Lets Encrypt, Mail Gun and Cloudflare - Part 1

We all have longed a website for ourselves, haven't we? In this post, we look at how do we set things up to have a Ghost blog up and running on an Ubuntu server hosted on GCP free tier in no time. I have consolidated information from various articles of similar nature. All such sources have been given due credits in the reference section
GOOGLE CLOUD FREE TIER
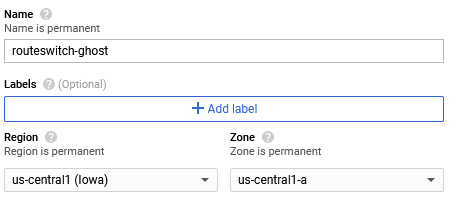
Step 1 - Set up a fully functional GCP account; with all payment info. If you are just starting with GCP the differences between free credit and always free tier can confuse you. Free credits give you the initial boost whereas always free tier allows you to run specific resources for free for a fixed number of hours in a month. In our case, we are interested in the Compute Engine resource. We should be choosing the resource from the region and zone entitled to always free tier.
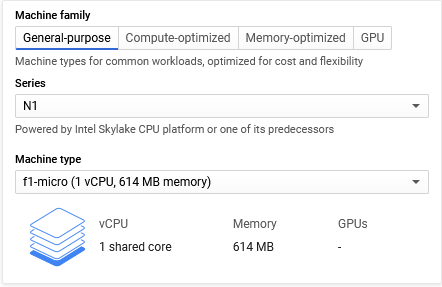
GCP free tier allows us to run an f1-micro instance for free. Under 'General Purpose' category select N1 Series and then select f1-micro.
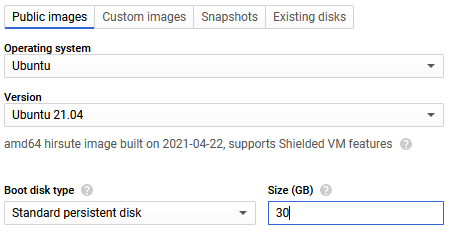
Select the desired OS; In my case, I have opted for Ubuntu 21.04 OS. Be careful when selecting the type of disk. The default option might be the balanced type ; but it doesn't come under the free tier criteria. We need to select the standard persistent disk and we can go up to 30GB.
Once the VM is up and running we should do the following basic steps to prepare our VM
- Note down the Public IP of the VM that you have spun up.
- Generate your key pair using putty gen. Add your public key data to GCP meta data.
- SSH into your VM using your private key.
- Perform apt-get update and apt-get upgrade
CREATE SWAP FILE FOR BETTER PERFORMANCE
As you might reckon, we have chosen an f1-micro for our blog which has limited RAM available. It is recommended to create a swap file for better performance.
Courtesy: http://www.theappliedarchitect.com/
You would want to make the changes to the swap file permanent.
sudo nano /etc/fstabEdit the file and append /swapfile swap swap defaults 0 0 at the end of the file.
INSTALL DOCKER
Step 2. The easiest way to get docker for your VM is to utilize the convenience script prepared by the docker team.
You can also choose to do the installation manually by following the steps mentioned on this page.
PREPARING YOUR DOMAIN
Step 3. You most probably have a registered domain with you. Quickly head to the area where you can key in the DNS servers or nameservers for the domain. Many domain registrars might charge an additional cost for letting you key in TXT /MX records, so it would be beneficial to change the name servers entirely to some free service like Cloudflare. If you are comfortable changing the records from the DNS server of the registrar; you can choose to do so.
In my case, I have opted to create a free account in Cloudflare and pointed my domains name servers to that of Cloudflare's. This will take some time to propagate. Cloudflare will let you know through an email when your domain is ready. During setup, you can choose caching options i.e if you want to proxy your sites traffic through Cloudflare's CDN or just opt for its DNS services. I have opted for the proxy as this would reduce the latency drastically. You can check that for yourself once you have done this configuration. If everything is okay you should have your landing page in Cloudflare looking like this:-
CREATE A MAILGUN FREE ACCOUNT
Step 3. After hosting a blog, you might want to send bulk emails; dispatching your well-written articles to everyone. The integration with Mailgun is the easiest. but should you chose to go with any other provider you are welcome to modify the code. After creating a free account you need to add appropriate records to your DNS server. Detailed documentation on the DNS records required for Mailgun can be accessed here. The document is self-explanatory. You will be required to add TXT records to be able to send mails from your domain. MX records are required to receive mail. ( We will not be using Mailgun to receive emails for our root domain) . I will explain how I had ZOHO always free tier set up for sending and receiving emails for our root domain. Once you key in all the relevant records and allow them to propagate; you will receive an email from Mailgun stating that you are now ready to start sending emails.
PREPARE CONFIG FILES FOR GHOST
Step 4. Make a new folder for Ghost. This would contain all the resources relating to our blog, making it easy for us to back up.
mkdir ghost_blogStep 5. Prepare config files. I should give credit to http://www.theappliedarchitect.com/ from where I got the template for this config file. I have done some modifications to the template to also include the SMTP setting for our Mailgun account. You can get your SMTP credentials under domain settings in the Mailgun dashboard.
This config file should be inside the ghost_blog folder that we have created already. The port settings can be modified according to your needs. I have opted to leave it at 2368 as I will be using a Nginx front end before the docker container.
I will reference a shell script prepared by http://www.theappliedarchitect.com/ that will help us do basic docker command functions from the shell. This will be useful to restart the container after reloads etc.
This script can be placed outside the ghost_blog folder. If you read through the shell script you will understand why. Note how I have used HTTPS everywhere. This would come in handy when you complete the HTTPS setup with Nginx, Let's Encrypt and Certbot. Before you run this script and kick start your docker container we need few more things installed and set up. In part 2 of this article, we will look into setting up Nginx, dispatching our mails through mail gun (through API & SMTP); setting up the member option in GHOST which will enable your visitors to sign up as members and receive your newsletters.
Hope it was a good read. Please let me know through comments if it helped setting up your blog. Bye.